Phone:
(701)814-6992
Physical address:
6296 Donnelly Plaza
Ratkeville, Bahamas.

Phone:
(701)814-6992
Physical address:
6296 Donnelly Plaza
Ratkeville, Bahamas.

Kitchen upgrades vary wildly in what they return at resale - here's which specific changes actually move the needle versus which just look nice.
Real estate agents will tell you that kitchens sell homes, but not all kitchen upgrades deliver equal returns. According to Remodeling Magazine’s 2025 Cost vs. Value Report, a major kitchen remodel recoups only 54% of its cost at resale, while strategic minor upgrades can return 85% or more. The difference lies in knowing which kitchen upgrades for resale value actually matter to buyers and which drain your budget without moving the needle.
This guide breaks down the specific projects that deliver measurable returns, what you can tackle yourself, and where you need to call in licensed professionals. Every recommendation includes real cost ranges, time estimates, and honest assessments of difficulty level.
Table of Contents
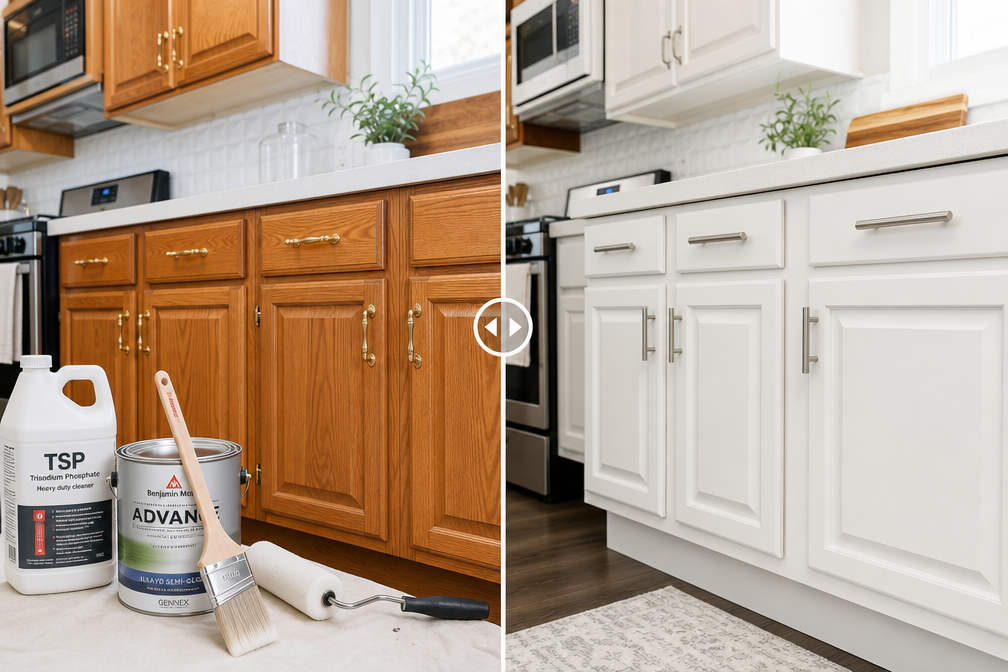
Cabinets dominate your kitchen’s visual impact. Buyers notice them immediately, and dated cabinets signal an outdated kitchen regardless of your appliances or countertops.
DIY-safe project with the right preparation and patience.
Cabinet painting delivers the highest return on investment of any kitchen upgrade when done properly. Expect to spend $200-600 in materials for an average kitchen and invest 3-5 full days of work.
Tool list:
Step-by-step approach:
Remove all doors, drawers, and hardware. Label everything with painter’s tape and numbers so reassembly goes smoothly. Clean every surface with TSP to remove grease and cooking residue that will prevent paint adhesion.
Light sanding with 120-grit creates tooth for primer. You don’t need to remove the existing finish completely, just scuff it enough for the new coating to grip. Wipe down with a tack cloth after sanding.
Prime everything. This step matters more than the topcoat. Use a bonding primer specifically designed for cabinets. Apply thin coats with a foam roller on flat surfaces and an angled brush for details and edges.
After primer dries (follow can directions, usually 4-6 hours), lightly sand with 220-grit, wipe clean, and apply your first coat of cabinet paint. Two thin coats always beat one thick coat. Allow proper dry time between coats (typically overnight).
Common mistakes:
Skipping the cleaning step causes paint to peel within months. Using wall paint instead of cabinet paint results in a finish that chips and scratches easily. Applying thick coats creates drips and an uneven surface. Rushing the dry time between coats causes the paint to remain soft and easily damaged.
For detailed guidance on the no-sand method some DIYers prefer, check out our article on painting kitchen cabinets without sanding, though traditional sanding produces more durable results.
Cost breakdown:
Licensed professional recommended for veneer application, though you can handle hardware yourself.
Refacing replaces door fronts and drawer faces while applying matching veneer to the cabinet boxes. This option works when your cabinet boxes are structurally sound but the style is dated.
Professional refacing costs $4,000-10,000 for an average kitchen and takes 3-5 days. You’ll get a completely new look for about one-third the cost of replacement.
Licensed professional required for proper installation, especially if plumbing or electrical work is involved.
New cabinets cost $8,000-25,000+ installed. This makes sense only if your existing cabinets are damaged, poorly constructed, or if you’re reconfiguring the kitchen layout. For resale purposes, painted or refaced cabinets in good condition deliver better ROI than replacement.
Cabinet hardware, faucets, and lighting fixtures create immediate visual updates for minimal investment. These are DIY-safe projects that take hours, not days.
DIY-safe project requiring only a screwdriver.
New cabinet pulls and knobs transform the kitchen’s appearance for $100-300. Buyers notice hardware immediately because it’s at eye level and hand level throughout the space.
Before you start:
Measure your existing hardware’s center-to-center distance (the space between screw holes). Buying hardware with the same spacing means no new holes to drill. If you want a different size, you’ll need to fill old holes with wood filler, sand smooth, and touch up paint before installing new hardware.
Choose finishes that match your faucet and appliances. Brushed nickel and matte black dominate 2026 kitchen trends, while brass is making a comeback in higher-end homes.
Tool list:
Installation takes 1-2 hours for an average kitchen. Remove old hardware, fill holes if needed, install new pieces. That’s it.
For specific product recommendations that balance quality and price, see our guide to the best kitchen cabinet handles.
Cost breakdown:
DIY-safe project with basic plumbing knowledge; licensed plumber required if supply lines need replacement or if you encounter corroded connections.
A new faucet costs $150-400 and takes 1-2 hours to install. This upgrade delivers immediate visual impact and improved functionality.
Tool list:
Step-by-step approach:
Turn off water supply valves under the sink. If these valves are stuck or won’t fully close, stop and call a licensed plumber. Forcing stuck valves can break them and flood your kitchen.
Place a bucket under the connections and disconnect supply lines from the old faucet. Remove mounting nuts with a basin wrench. Lift out the old faucet and clean the sink surface thoroughly.
Follow the new faucet’s instructions exactly. Most modern faucets include detailed diagrams. Apply plumber’s putty or the included gasket to the base, insert supply lines through the sink hole, and secure from underneath with mounting hardware.
Connect supply lines hand-tight, then add one-quarter turn with a wrench. Turn water back on slowly and check for leaks. Run water for several minutes and inspect all connections.
Our detailed guide on how to replace a leaky kitchen or bathroom tap covers troubleshooting common installation problems.
Common mistakes:
Over-tightening connections can crack plastic nuts or strip threads. Forgetting to turn off water before starting creates an instant flood. Skipping the leak test means discovering problems after you’ve put everything away.
For product recommendations, check our review of the best kitchen faucets that balance features and durability.
Cost breakdown:
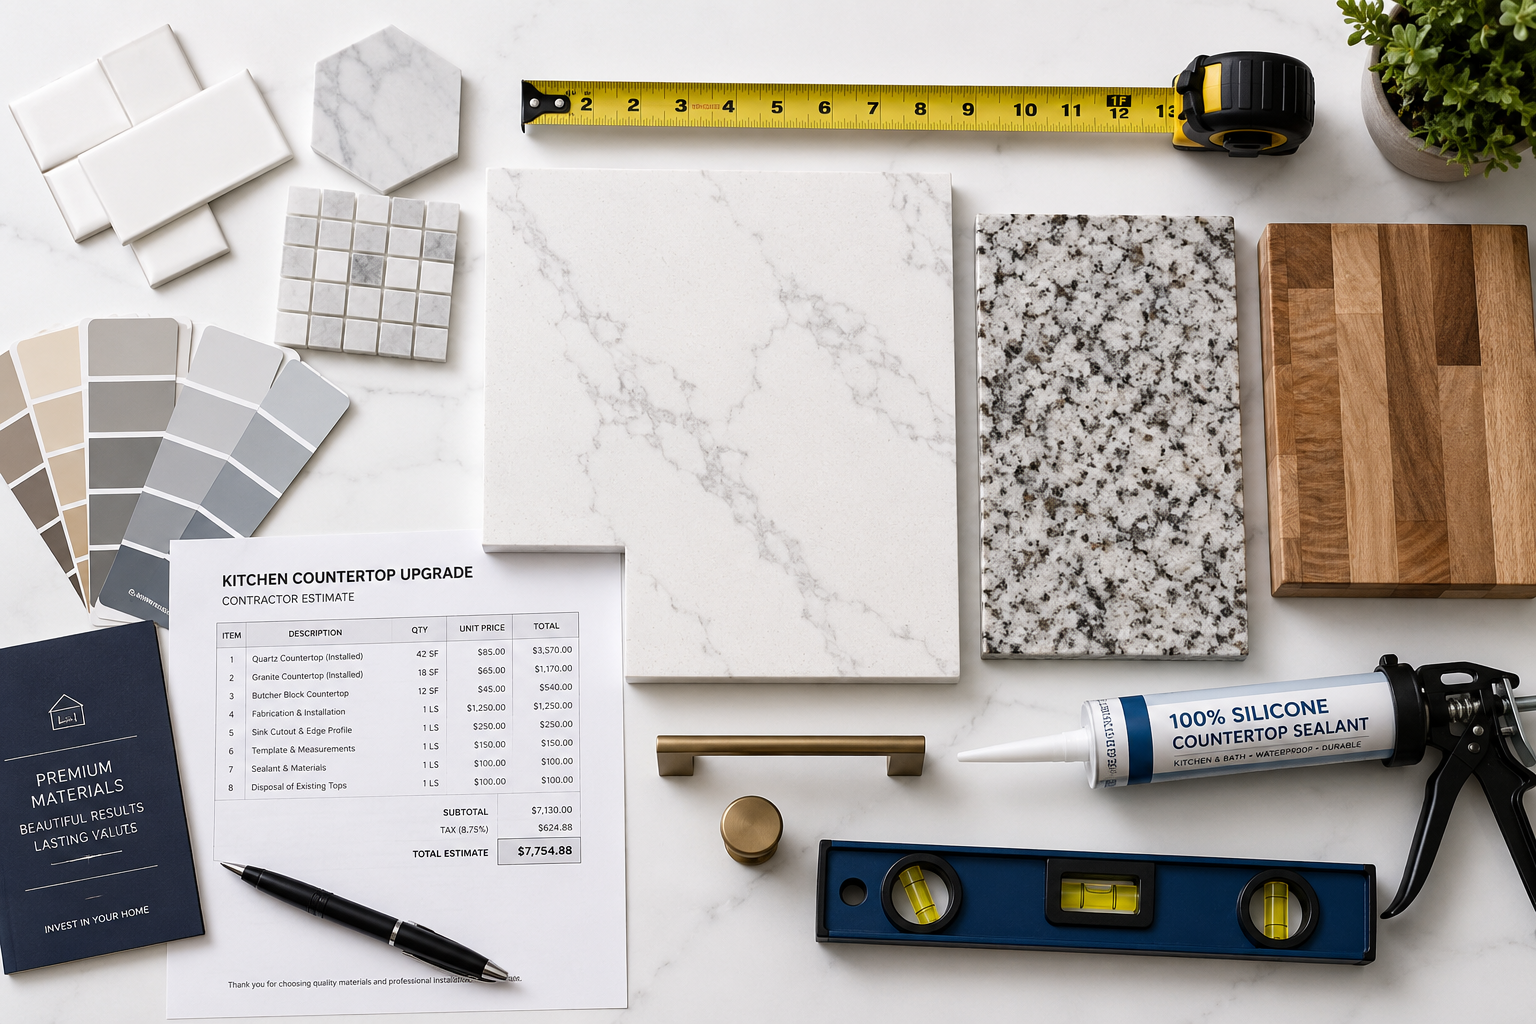
Countertops rank second only to cabinets in buyer attention. Dated laminate or worn surfaces signal deferred maintenance, while updated countertops suggest a well-maintained home.
Licensed professional required for fabrication and installation.
Quartz delivers the best balance of appearance, durability, and cost for resale value in 2026. Expect to pay $60-100 per square foot installed for mid-grade quartz.
An average kitchen (30-40 square feet of countertop) costs $2,400-4,000 installed. Quartz offers consistent patterning, stain resistance, and low maintenance that appeals to buyers. Unlike granite, it never needs sealing.
Licensed professional required for fabrication and installation.
Granite costs $50-100 per square foot installed for mid-grade material. While still popular, granite has lost some appeal to quartz because it requires annual sealing and can stain if not properly maintained.
Granite makes sense if you find a great deal on remnant pieces or if your home is in a higher price bracket where natural stone is expected.
DIY-capable for straight runs with basic carpentry skills; licensed professional recommended for complex layouts or integrated sinks.
Butcher block costs $40-80 per square foot for materials. Installation requires accurate measuring, cutting, and sealing. This option works well for islands or smaller sections but may not appeal to all buyers as a primary countertop material.
DIY-capable for straight sections; licensed professional recommended for complex cuts and integrated backsplashes.
Modern laminate has improved dramatically from the 1990s versions. High-quality laminate costs $20-50 per square foot installed and can mimic stone patterns convincingly.
For budget-conscious upgrades in starter homes, laminate delivers acceptable returns. In mid-range and higher homes, buyers expect quartz or granite.
Cost comparison for 35 square feet:
DIY-safe project for standard tile; licensed professional required if electrical outlets need moving or if working with expensive materials.
A tile backsplash costs $300-800 in materials for an average kitchen and takes one weekend to install. This upgrade creates visual interest and protects walls from cooking splatter.
Tool list:
Step-by-step approach:
Clean and repair the wall surface. Remove outlet covers and turn off power at the breaker. Plan your layout starting from the center and working outward to ensure balanced cuts at the edges.
Apply thin-set mortar in small sections (3-4 square feet) using the notched trowel. Press tiles firmly and use spacers for consistent gaps. Work methodically across the space.
After 24 hours, remove spacers and apply grout. Work it into joints with a grout float held at 45 degrees. Wipe excess with a damp sponge, rinsing frequently. After grout hazes over (15-20 minutes), polish with a dry cloth.
Seal grout after 72 hours of curing to prevent staining.
Common mistakes:
Mixing too much thin-set or grout at once causes waste when it hardens before you can use it. Skipping the layout planning results in awkward cuts in visible areas. Not allowing proper cure time before grouting causes tiles to shift.
For layout ideas that work in various kitchen configurations, see our backsplash layout inspiration for unique kitchens.
Cost breakdown:
Poor lighting makes kitchens feel cramped and dated. Updated lighting fixtures and improved illumination create an immediate positive impression.
DIY-safe project for plug-in or battery-powered systems; licensed electrician required for hardwired installations.
LED strip lighting or puck lights cost $80-200 for materials and take 2-4 hours to install. This upgrade eliminates shadows on countertops and creates a modern, upscale appearance.
Plug-in systems connect to existing outlets and require no electrical work. Hardwired systems look cleaner but require running wire through cabinets and connecting to a switch, which needs a licensed electrician.
Licensed electrician required if installing new electrical boxes or moving existing fixtures; DIY-capable for simple fixture replacement on existing boxes.
Pendant lights cost $100-400 per fixture. Replacing existing fixtures on the same electrical box is DIY-safe. Installing new pendants where none existed requires running new electrical wire and installing boxes, which needs a licensed electrician and may require a permit.
Before you start any electrical work:
Turn off power at the breaker, not just the switch. Test with a voltage tester to confirm power is off. If you’re uncomfortable working with electrical connections, call a licensed electrician. Mistakes can cause fires or electrocution.
For safe DIY fixture replacement guidance, see our article on how to replace a light fixture safely for beginners.
Licensed electrician required for installation, especially in finished ceilings.
Adding recessed lights requires cutting ceiling holes, running electrical wire, and installing housings. This work needs a licensed electrician and typically requires a permit.
Cost runs $150-300 per light installed. For kitchens, plan on 4-8 recessed lights depending on size.
Cost breakdown for lighting upgrades:
Kitchen flooring takes heavy abuse from foot traffic, spills, and dropped items. Worn or dated flooring undermines other upgrades.
DIY-capable for floating floor installations; licensed professional recommended for glue-down installations or complex layouts.
LVP costs $3-7 per square foot for materials and installs over most existing floors. Modern LVP is waterproof, durable, and mimics wood or stone convincingly.
For a 120-square-foot kitchen, expect to spend $360-840 in materials plus 1-2 days of work. Floating LVP clicks together without glue or nails, making it genuinely DIY-friendly.
Tool list:
DIY-capable for experienced DIYers; licensed professional recommended for beginners or large areas.
Tile costs $2-8 per square foot for materials. Installation requires the same tools and process as backsplash work but covers a much larger area. Mistakes are more visible and harder to fix on floors.
If you’re comfortable with tile work, floor installation is manageable. If you’ve never tiled before, practice on a small bathroom floor before tackling the kitchen.
For budget-friendly options that don’t sacrifice quality, see our guide to affordable kitchen floor tile solutions.
Licensed professional recommended unless you have flooring experience.
Refinishing existing hardwood costs $3-5 per square foot professionally. This option works only if you have solid hardwood (not engineered) with enough thickness remaining for sanding.
Rental floor sanders are powerful machines that can gouge floors if used incorrectly. Most homeowners get better results hiring professionals for this project.
Cost comparison for 120 square feet:
Appliances influence buyer perception, but full replacement rarely delivers strong ROI unless existing appliances are broken or severely outdated.
Matching stainless steel appliances create a cohesive, updated appearance. If your appliances are mismatched colors or more than 15 years old, replacement makes sense.
Budget $2,000-4,000 for a basic four-piece package (refrigerator, range, dishwasher, microwave). Expect to recoup 60-80% at resale in most markets.
DIY-safe: Replacing freestanding ranges and refrigerators requires no special skills beyond disconnecting and reconnecting utilities. Licensed professional required: Gas range connections need a licensed plumber or gas fitter. Built-in appliances often require cabinet modifications best handled by professionals.
If your appliances are less than 10 years old, clean, and functioning well, skip this upgrade. Buyers care more about cabinets, countertops, and overall condition than appliance brand names.
High-end appliances (Sub-Zero, Wolf, etc.) make sense only in luxury homes where buyers expect them. In average homes, mid-range stainless appliances from major brands deliver better ROI.
Fresh paint creates the perception of a well-maintained home. Kitchen walls take abuse from cooking splatter and humidity, making paint refresh particularly impactful.
DIY-safe project requiring basic painting skills.
Tool list:
Step-by-step approach:
Remove everything from walls. Clean thoroughly with TSP to remove grease. Fill holes and imperfections with spackling compound, let dry, and sand smooth.
Prime any repaired areas and stains. Cut in edges with a brush, then roll walls in 3×3-foot sections. Two thin coats beat one thick coat.
Choose neutral colors that appeal to broad buyer preferences. Whites, soft grays, and warm beiges work in most kitchens. Avoid bold colors that reflect personal taste.
Cost breakdown:
Smart home features appeal to younger buyers and create a modern impression. Focus on practical technology, not gimmicks.
DIY-safe project for switch replacement; licensed electrician required if adding new circuits or three-way switch conversions.
Smart switches cost $40-80 each and replace standard switches. Installation takes 15-30 minutes per switch if you’re replacing a simple single-pole switch on an existing box.
Turn off power at the breaker before starting. If you encounter more than two wires (plus ground) in the box, or if you’re unsure about any connections, call a licensed electrician.
DIY-capable for most installations; licensed HVAC technician required for systems with complex wiring or if you’re uncomfortable with the installation.
Smart thermostats cost $120-250 and can reduce energy bills by 10-15%. Most installations take 30-60 minutes and require only a screwdriver and basic wire labeling.
For detailed installation guidance, see our article on how to install a smart thermostat yourself.
Some kitchen projects drain budgets without delivering proportional returns. Avoid these unless you’ll enjoy them for years before selling.
Custom cabinets cost $20,000-50,000+ and rarely return more than 50-60% at resale. Painted or refaced stock cabinets in good condition appeal to buyers just as much.
Professional-grade ranges and built-in refrigerators cost $5,000-15,000 per appliance. Unless your home is in the luxury market where buyers expect these features, stick with quality mid-range appliances.
Moving walls, relocating plumbing, or expanding the kitchen footprint costs $15,000-50,000+ and creates construction disruption for months. These projects make sense only if you’re staying in the home long enough to enjoy the results.
Bold backsplash patterns, unusual countertop materials, or trendy paint colors reflect personal taste that may not match buyer preferences. Stick with classic, neutral choices that appeal broadly.
Prioritize projects based on your budget, timeline, and current kitchen condition. This strategic approach maximizes resale value.
Focus on cosmetic updates that create immediate visual impact:
These projects take one to two weeks of weekend work and deliver 80-100% ROI.
Add surface upgrades that buyers notice immediately:
This level of upgrade transforms the kitchen’s appearance for 15-25% of a full remodel cost while delivering 75-90% ROI.
Include major surface replacements:
This comprehensive update delivers 70-85% ROI and positions your home competitively in most markets.
Proper sequencing prevents rework and damage to completed upgrades.
Correct order:
Never install flooring before cabinets or countertops. Never paint walls before messy tile or flooring work.
Understanding when permits are required protects you from code violations that can derail a sale.
Permit needed:
Licensed professional required:
DIY-safe without permits:
Check local requirements before starting any project. Permit requirements vary by jurisdiction.
Track costs carefully to understand your actual return on investment.
Cost tracking:
ROI calculation: (Increased home value – total project cost) / total project cost x 100 = ROI percentage
Example: $3,000 in kitchen upgrades increases home value by $5,000. ($5,000 – $3,000) / $3,000 x 100 = 67% ROI
Projects with 60%+ ROI are considered good investments for resale purposes.
Avoid these errors that waste money without improving buyer appeal.
Over-improving for the neighborhood: Installing $15,000 in quartz countertops in a neighborhood where homes sell for $200,000 won’t return your investment. Match upgrade quality to your home’s price range and neighborhood standards.
Ignoring the rest of the home: A stunning kitchen in a house with worn carpets, dated bathrooms, and peeling exterior paint creates disconnect. Buyers wonder why you invested heavily in one room while neglecting others.
Personal taste over broad appeal: Bold colors, unusual materials, or highly specific design styles limit buyer appeal. Stick with neutral, classic choices that work with various decorating preferences.
DIY projects beyond your skill level: Poorly executed tile work, uneven paint finishes, or crooked cabinet doors signal amateur work that makes buyers question other home maintenance. Know when to call professionals.
Skipping proper preparation: Painting over grease, installing tile on damaged walls, or laying flooring over uneven subfloors creates problems that show immediately and worsen over time.
For more guidance on building DIY skills that genuinely add value, see our article on beginner DIY skills that add real value.
What kitchen upgrade adds the most value? Cabinet painting or refacing delivers the highest ROI (80-100%) for kitchen upgrades for resale value. This project costs $300-8,000 depending on whether you DIY or hire professionals, and creates immediate visual transformation that buyers notice. Combined with new hardware ($100-300), this upgrade delivers maximum impact for minimum investment.
Should I replace appliances before selling? Replace appliances only if they’re broken, severely outdated (15+ years), or mismatched colors. Matching stainless steel appliances appeal to buyers, but functional appliances less than 10 years old don’t need replacement. Focus budget on cabinets, countertops, and cosmetic updates that deliver better ROI.
Can I install kitchen countertops myself? Laminate and butcher block countertops are DIY-capable with carpentry skills and proper tools. Quartz and granite require professional fabrication and installation due to weight, specialized cutting equipment, and seam-joining techniques. Mistakes on stone countertops are expensive and difficult to fix. Most homeowners get better results hiring professionals for stone countertops.
How much should I spend on kitchen upgrades for resale? Spend 5-15% of your home’s value on kitchen upgrades for resale value, focusing on projects that deliver 60%+ ROI. For a $300,000 home, budget $15,000-45,000 maximum. Prioritize cabinet refresh, countertops, and cosmetic updates over structural changes or luxury appliances. Match upgrade quality to neighborhood standards.
Do I need permits for kitchen upgrades? Permits are required for electrical work beyond fixture replacement, plumbing relocations, gas line work, and structural changes. Cosmetic updates like painting cabinets, installing new hardware, replacing faucets, or adding tile backsplash typically don’t require permits. Check local building department requirements before starting any project.
What’s the best countertop material for resale value? Quartz offers the best balance of cost, durability, and buyer appeal in 2026. It costs $60-100 per square foot installed, never needs sealing, resists stains, and appeals to buyers seeking low-maintenance materials. Granite remains popular but requires annual sealing. Avoid unusual materials that reflect personal taste rather than broad buyer preferences.
Strategic kitchen upgrades for resale value focus on projects that deliver measurable returns without over-improving for your neighborhood. Cabinet painting or refacing, updated hardware and fixtures, countertop replacement, and fresh lighting create the visual impact buyers notice while keeping costs reasonable.
Prioritize DIY-safe projects like cabinet painting, hardware replacement, and backsplash installation to maximize ROI. Call licensed professionals for electrical work beyond fixture replacement, gas line connections, and stone countertop installation. This approach balances cost control with quality results.
Start with a realistic budget based on your home’s value and neighborhood standards. Focus on neutral, classic choices that appeal to broad buyer preferences rather than personal taste. Track costs carefully and sequence projects properly to avoid rework.
The most successful kitchen upgrades combine smart planning, honest assessment of DIY capabilities, and focus on projects that buyers actually value. With the right approach, you’ll create a kitchen that sells quickly while recouping 70-100% of your investment.
For more projects that boost home value through DIY work, explore our guide on easiest DIY upgrades with big payoff.